

For working with a virtual model, it looks great. But it just doesn't look like a shiny, new set of Lego bricks. I've seen many CGI renders of virtual sets that looked very close to the real thing, so I set about using my Google-fu skills to find out how it's done. Eventually I found two great tutorials that put me on the right track: One on Bricks'n'Gears and another on Eurobricks.com. Both advocated using a 3D rendering program called POV-ray, a very high quality ray tracing renderer. The only problem is that the process of getting from LDD to POV-Ray gets a little involved. There are some between steps that involve a format called LDraw that is well known in the virtual Lego world. LDraw is an open standard for creating computer generated representations of Lego blocks and assemblies. Since it's an open standard (meaning anyone who wants to can open up the code and see how it works), there have been many programs and projects that have been developed to use LDraw by third party programmers. Also, all of these programs are free, which is something that makes me happy. LDraw is such a popular standard, that the LEGO Group provided a way in LDD to export their proprietary format (meaning no knows how it's put together) into an LDraw file that can be used by these programs.
 One of the most popular programs for working with LDraw files is MLCAD, which is short for Mike's LEGO CAD. Like LDD, MLCAD provides access to a huge assortment of official bricks in all the popular colors. It actually has a few advantages over LDD. For one thing, there are more parts available. LDD generally only provides the parts that are still available in sets that are currently sold in stores or are in use, while MLCAD has a lot of older parts (in addition to the new ones) that have been out of production for a while. For instance, remember those old castle bases with the pits in the four corners? MLCAD also allows you to place any brick in any location at any angle you want. In LDD, you can either place a brick on the ground, or it has to attach to another brick. Where this really shines in MLCAD is if you want to place a MiniFig on a smooth surface, like a park bench with smooth plates used as the seating. You can't easily do that in LDD. Despite these advantages, I still prefer to do most of the work in LDD just because I think it has a more intuitive feel (MLCAD has a pretty steep learning curve), and it just feels a little more like you're working with the bricks as you would in real life. That being said, I will definitely be using MLCAD frequently for fine tuning and putting the finishing touches on projects.
 Getting back to the original topic of realistic photos, MLCAD also doesn't offer any improvement over LDD in the visual department. That brings us to another LDraw based program, LDView. This program doesn't allow you to move, add, or subtract bricks from an LDraw file, only view it. However, in viewing the file, you can rotate around the model, add light sources to it, and manipulate a few other visual elements. As you can see in the picture, it's an improvement over both LDD and MLCAD, but still not quite the result one would hope for. However, LDView does offer a great feature for getting the project to the final program. Just like LDD features an export to the LDraw format, LDView has an export option for a POV-Ray file.
 If you thought MLCAD or any of the other previous programs were intimidating, POV-Ray is a beast. If you look at the POV-Ray screen capture, you're just going to see lines of text and numbers, no fancy model pictures. For a lot of people, looking at a POV-Ray file is no different than looking at green Matrix code, it's indecipherable. However, with a little knowledge of programming and 3D geometry, some of the program makes sense. I won't being trying to explain the program (there are tons of tutorials on the Internet, which is how I learned), other than to give a brief description of what it does. LDView created a POV-Ray file, which is basically a way of describing a model by describing the shapes in the model (size, location, color, what materials they are made of), where they are in 3D space, where the virtual camera is located, where the camera pointing, and what light sources are in the scene. Once all this information is all set, you tell POV-Ray to render the scene. POV-Ray then runs all the information through a host of complicated calculations of how the light sources interact with the camera and the objects, and renders a picture of the scene. This can take from minutes to hours depending on how complicated the scene is, so you can imagine how much computer power this takes (the final scene I made with one light source took 5 minutes on a quad-core computer).
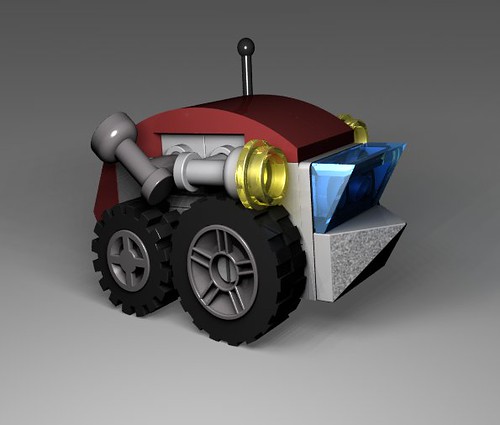
So was the whole process worth it. I think so. It's going to take some more playing around and educating myself about POV-Ray, but with a couple of hours of experimentation, I was pretty happy with the result, especially with the transparent pieces.

THANKS BRO THIS POST IS VERY HELPFUL ESPECIALLY FOR BRICK MANIACS ONCE AGAIN THANK YOU
ReplyDelete